


Our Services
Adventis ENT Services is dedicated to providing excellence in standards of care to children and adults for all conditions of Ear, Nose & Sinus, Throat & Voice, Head & Neck, Hearing & Speech disorders The team of Adventis ENT Services is led by Dr Ameet Kishore FRCS(UK), an ENT, Cochlear Implant & Neurootologic Surgeon with over 25 years of experience. He has brought together International Experience and Advanced Technology to offer the highest level of patient care and excellence in medical treatment
- Endoscopic & microscopic examination of ear, nose and throat
- Microscopic surgery for ear, hearing restoration & neuro-otology
- Cochlear Implant and Implantable Hearing device programme
- Endoscopic surgery of nose, sinus & skull base
- Paediatric ear, nose, throat and airway surgery
- Head-neck, salivary & thyroid gland surgery
- Snoring, sleep apnoea, robotics, lasers and radiofrequency
- Comprehensive hearing testing facility for children and adults*
- Provision for fittng of hearing aids and for Hearing – Speech therapy*
We want you to feel confident that you are working with doctors and professionals who are qualified, experienced and caring to provide you personalised and professional care to improve your quality of life.
ENT & Cochlear Implant Clinics
Delhi, Gurgaon, Noida, Faridabad, Patna
What is a Tracheostomy?
A tracheostomy is a short surgical procedure, done either bedside or in an operation theatre, in which an ENT surgeon places a tube for breathing into the patient’s trachea (windpipe) in the neck. The reasons may include bypassing a blockage in the airway, to assist patient who cannot cough out the mucus from their lungs, and to aid a patient who needs to be on a ventilator (artificial breathing machine) for a long time. Although the tracheostomy tube is placed in the front of the oesophagus (swallowing tube), most people are able to eat normally. However, as the air flow through the tube bypasses the larynx (voice box), one may be unable to speak while the tube is in place, depending on the type of tube. Depending on the need for the tracheostomy, it may be temporary or permanent.


Caring for the Tracheostomy
Before you go home, you will be taught to look after the tracheostomy yourselves. A tracheostomy needs extra care because it is a much more direct route to the lungs and therefore, the air going into the lungs will not have the benefit of the warming, moistening and filtering effect of the nose. Also, the tube needs attentive care to prevent its blocking with secretions. The tapes holding the tube in place will need to be changed daily or when they become dirty or wet. The tube will need to be changed periodically, depending on the type.
Before you take the patient home, at least one person in your household must be confident in the main activities involved in caring for the tracheostomy.
These include:
- Suctioning
- Changing of the tape
- Care of the stoma
- Cleaning of the inner cannula (when present)
- Changing of the tube
It is natural to feel overwhelmed initially, but with practice you will become experts in the care of your relative. Every person is different and in time you will find a routine that suits you best. Emergency services at the hospital can always be reached over the phone, when in doubt.
Suction
Why?
To remove mucous from the airway, to allow easier breathing, and prevent infections. Mucous is the body’s normal method of cleaning the airway. During the first few weeks after a tracheostomy, relatively large amount of mucous forms because of the surgery on the airway, and the tissue’s normal response to the new tube. This reduces over time. Also, the cough is not effective due to the position of the tube.
When?
- Noisy breathing (the sound of air bubbling through secretions, or a dry whistling)
- Visible secretions at the tracheostomy tube opening
- Cough with the sound of secretions in the tube Rapid breathing, or laboured breathing
- Restlessness, crying in a child
How?
- Make sure you have all the equipment you need ready:
• suction unit; • catheter; • connecting tubes; • syringe of saline; • bowl or bottle of tap water to flush the tube. - Wash your hands.
- Turn on the pump and check the pressure as instructed.
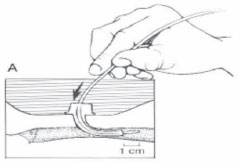
- Gently insert the catheter into the tracheostomy tube (with your thumb off the side port of the suction catheter). The distance it is passed depends on the length of the tracheostomy tube, you will be told of this at the hospital.
- Apply suction, by covering the port with your thumb, and slowly withdraw the catheter. This should take only 5 or 6 seconds.
- Repeat as required. Give the patient time to catch a breath between suctions.
- Disconnect the catheter from the tubing and dispose of it safely. Clear the tubing by suctioning a small amount of water through it.
The lining of the trachea is very sensitive and can be damaged easily by the suction catheters. In order to minimize the trauma to the trachea, pass the catheter just to the end of the tracheostomy tube. This removes the secretions and reassures you that the tube is not blocked.
Watch for
Infection may alter the nature of the mucous. You should notice the secretions, when:
- they have changed colour
- they are thicker than usual
- you are using suction more often than usual
- they have an unpleasant smell
- they are tinged with small specks of blood
Tape Change
A tracheostomy tube is held in place by cotton ties or Velcro tapes which need to be changed when soiled or wet. It is essential that the knots or Velcro are secure and the tension of the tapes is correct. If they are too tight the patient will experience discomfort and the skin may develop abrasions. If they are too loose the tube can be pulled out. Skin that is constantly in contact with wet tapes will develop sores or rashes.
At home, this will usually need to be done only once a day, usually after a bath. It is essential to change tapes with two people, as one person is needed to hold the tracheostomy tube while the other ties the tapes.
How?
- Make sure you have all the equipment you need ready:
round-ended scissors; two lengths of half inch cotton tape or Velcro tapes; saline and gauze to clean the skin. - Wash your hands
- Have all the equipment in easy reach
- Suction if necessary
- Position the patient on his or her back with the neck extended over a rolled-up towel to give better access to the area around the tracheostomy tube.
- Place the clean tapes behind the neck.
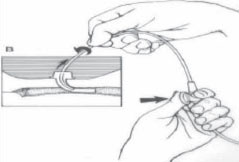
- Carefully hold the tube in position to prevent it becoming dislodged (one person), cut and remove the dirty tapes (the other person).
- Clean and dry around the tracheostomy tube.
- Thread the end of one of the tapes through the tracheostomy tube flange on the far side and tie it to the other with three knots.
- Repeat this procedure on the other side.
Keep the tapes as unwrinkled as possible and try to achieve the correct tension before tying the bow. Be careful to check that the knots are tight and the tension is correct at the end of the procedure.
Stoma Care
When you are changing the tapes, check the skin around, above, below and behind the stoma for red or irritated areas. If the skin is sore, a sterile keyhole dressing can be applied between the skin and flanges, taking care not to cover the tracheostomy tube. The dressing should be changed regularly as wet dressings can cause infection and irritate the skin. The key is to keep the site completely dry.
Tracheostomy tubes can cause the skin to develop granulation tissue (excess new tissue) in and around the opening to the stoma. This can cause bleeding and can sometimes make it difficult to change the tube. Discuss this with the doctor if this problem arises; granulations may need to be cauterised or removed.
Inner Cannula Cleaning
You need to clean the inner cannula at least once or twice a day. If your patient’s mucous is thick or sticky, you may need to clean it as often as ten times a day.
How?
- Wash your hands.
- Gently pull out the inner cannula.
- Place the inner cannula in a bowl and cover with hydrogen peroxide. Let it soak in the solution for at least 1 minute.
- Pick the inner cannula up and clean the inside and outside with pipe cleaners or cotton- tipped swabs.
- After you scrub off all the sputum, hold the inner cannula under running tap water briefly.
- Shake the excess water off the inner cannula.
- Reinsert the inner cannula into tracheostomy and lock it in place.
Tube Change
Why?
To prevent mucus plugs in the tracheostomy tube and to keep the tracheostomy tube clean.
When?
Change the tracheostomy tube every 1-2 weeks.
How?
- Prepare equipment:
round-ended scissors; two lengths of 1/4 inch cotton tapes or Velcro tapes; new tube – check correct size and that the tube is intact and in good order; a smaller sized tube in case the usual one does not go in;
water-based lubricant to prevent the tube sticking to the skin as it is inserted. - Wash your hands.
- Prepare tube – take out of wrapping and hold by the flanges. Put in introducer (if applicable). Apply a small amount of lubricant
jelly to the outer side of the tube, taking care not to let it get into the ends of the tube. Place the tube on the wrapper. - Have all equipment within easy reach.
- Suction if necessary.
- Position the patient as you do for tape changing.
- Hold the tube (one person). Cut and remove the dirty tapes and place clean tapes behind your child’s neck (the other person).
- Continue to hold the tube (one person). Hold the new tube by the flanges and position the tip near your child’s neck (the other person).
- Gently remove the old tube following the curve of the tube.
- Firmly and gently slide in the new tube, again following the curve of the tube so as not to damage the trachea. Do not force it in. Remove introducer if this has been used.
- Hold the new tube in securely – changing the tube will cause your relative to cough which could dislodge it.
- Allow the coughing to settle. Check air flow through the tracheostomy tube. Suction if necessary.
- Clean and observe the skin around the tube.
- Tie the tapes.
- Do not let go of the tube until the tapes are secure.
General Tips

- Keep things normal.
- Be careful around water: bathing and hair washing. (NO swimming!)
- Avoid covering the tracheostomy with clothing.
- Avoid smoke, fumes and aerosols.
- Maintain humidification.
- Pet fur and feathers may act as irritant.
- Be watchful at night time.
- Have a bell by the bed to call you if help is needed. An intercom, which can be bought from any large store, will allow you to hear
- what is happening.
- Have a pen & paper available for communication.
Decannulation
The eventual goal is to remove the tracheostomy tube from your relative. This process is called decannulation.
Removal of the tube can be done in a number of different ways and is closely supervised in hospital. While usually straightforward in an adult, the process of ward decannulation takes several days in children. A smaller tube is inserted as a routine tube change. This allows the stoma to begin the gradual process of closing. Once the smallest possible tube is used, it is blocked with a small bung for 24 hours. If the child has tolerated this, the tube is removed completely and the stoma covered with an airtight dressing.
This process usually goes well, but sometimes the original tube needs to be replaced for a period until the consultant decides that decannulation can be tried again. Sometimes the stoma does not close on its own and the child has to be admitted at a later stage to have the hole closed under anaesthesia.
